 IMG to PDF
 Word to PDF
 Excel to PDF
 JPG to PDF
 PNG to PDF
 Text to PDF
 PPT to PDF
 PDF to Image
 PDF to Word
 PDF to Excel
 PDF to JPG
 PDF to PNG
 PDF to Text
 PDF to PPT
 Word to JPG
 Word to PNG
 IMG to Word
 IMG to PPT
 IMG to Excel
 IMG to Text
 Merge PDF
 Split PDF
 Organize PDF
 OCR PDF
 Delete Page
 Add Page To PDF
 Compress PDF
 PDF Form Filler
 Fill Out PDF
 Create Fillable PDF
 Edit PDF
 Crop PDF
 Sign PDF
 Rotate PDF
 Add Watermark
 Add Number page
 Protect PDF
 Unlock PDF
 Redact PDF
 PDF To PDF/A
 PDF Translator
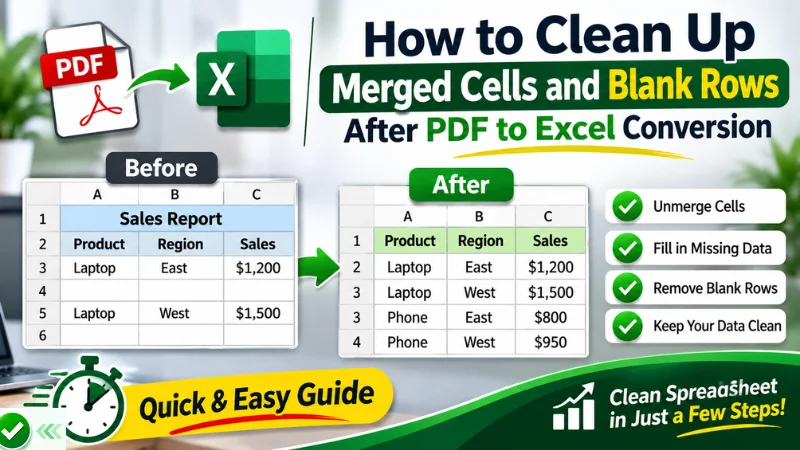
Converting a PDF to Excel can save you a lot of time. The result is often a messy spreadsheet. The headers are merged across columns, and empty rows appear all over your data. Sorting stops working, filters skip rows, and formulas return errors. With a few simple Excel tools, you can fix most of these formatting issues and make your spreadsheet easier to manage.
In this guide, you will learn how to clean up cells after a PDF to Excel conversion with simple, practical steps. You will unmerge cells, fill in the missing data, and remove rows without losing a single value. You will also learn how to keep your PDF to Excel conversion clean, from the start.
Why PDF to Excel Conversion Creates Merged Cells and Blank Rows
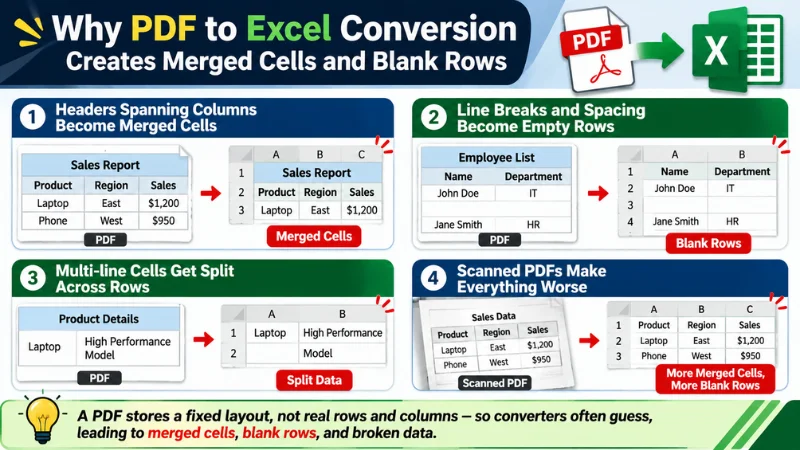
A PDF is built to look the same on every screen. It stores text and lines at fixed positions on a page, but it has no real rows, columns, or cells. When a converter turns that file into Excel, it has to guess where the table structure is. Most tools copy the visual layout instead of rebuilding the data structure, and that is where the problems start.
Headers spanning columns become merged cells
In a PDF, a title or group heading is often centered across several columns. The converter sees one block of text sitting above multiple columns and merges those cells to match the look. The result is a header that no longer lines up with a single column of data.
Line breaks and spacing become empty rows
The white space between sections, paragraphs, or table groups in a PDF has no meaning as data. Converters still read that space as part of the layout, so they insert blank rows to reproduce the same gaps.
Multi-line cells get split across rows
When a cell in the original table wraps onto two or three lines, the converter often treats each line as its own row. You end up with one record spread across several rows, with blank cells next to the ongoing text.
Scanned PDFs make everything worse
A scanned PDF is just an image of a page, so the converter must use OCR to read the text and then guess the table borders. Slightly skewed pages, faint lines, and shadows lead to misread boundaries, which means more merged cells, more blank rows, and more broken records than you would see with a text-based PDF.
Problems Merged Cells and Blank Rows Cause
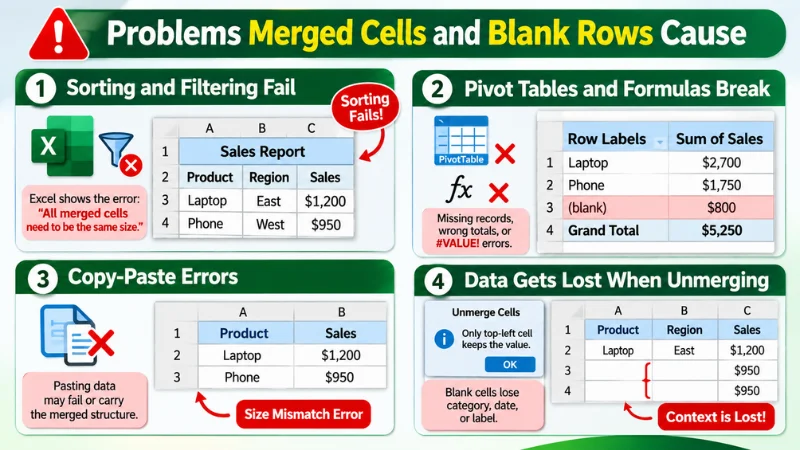
Merged cells and blank rows may look harmless, but they cause real problems the moment you start working with your data.
Sorting and filtering fail
Excel cannot sort a range that contains merged cells of different sizes, and it often shows the error “All merged cells need to be the same size.” Blank rows are just as bad, because Excel treats them as the end of your table. A filter or sort then applies only to the rows above the gap, and the rest of your data stays untouched and out of order.
Pivot tables and formulas break
Pivot tables need one clean header row and a value in every cell of each column. Merged cells leave empty cells behind, and blank rows split the data source in two, so your pivot table ends up with missing records, “(blank)” categories, or wrong totals. Formulas such as SUM, VLOOKUP, and COUNTIF can also return incorrect results when they hit empty cells or ranges that stop at a blank row.
Copy-paste errors
Pasting data from a range with merged cells into another sheet often fails or throws a size mismatch error. When it does work, the merged structure comes along with it, so you carry the same problem into every new file.
Data gets lost when unmerging without a fix
When you unmerge a cell, Excel keeps the value only in the top-left cell and leaves the others empty. If you stop there, those blank cells have no category, date, or label, and every row below the header loses its context. This is why unmerging alone is not enough, and why you need to fill the empty cells right after.
Before You Start: Quick Preparation
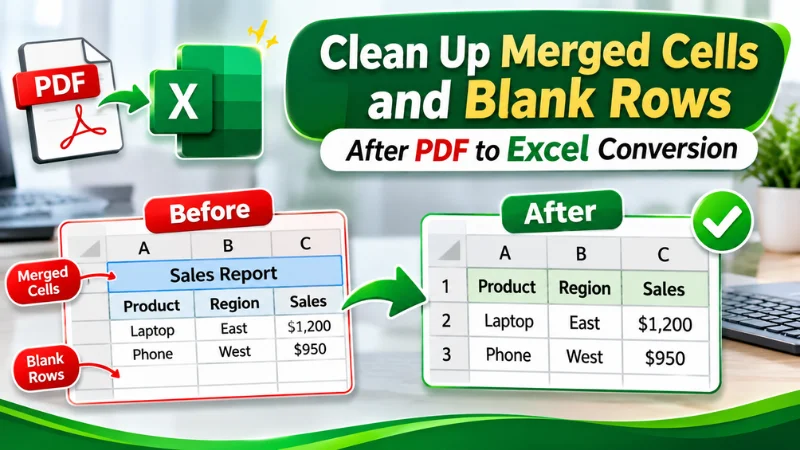
A few minutes of prep protects your data and makes the cleanup smoother.
Save a backup copy of the file
Use File > Save As and keep the original converted file untouched. If a step goes wrong, you can go back without converting the PDF again.
Check the data range
Scroll through the sheet and find where your table starts and ends. Press Ctrl + A inside the data to see the selected range, and look for hidden rows or columns that may contain data. Knowing the exact range helps you avoid cleaning cells outside your table.
Remove any totals or footer notes you don’t need
Page numbers, repeated headers, grand totals, and footnotes often come through as extra rows. They can add merged cells and blank rows that break your table. Delete them first, or move them to a separate sheet if you still need them.
Step-by-Step: Clean Up Merged Cells
Follow these four steps in order. Each one builds on the one before it.
Step 1: Select the Sheet and Unmerge Cells
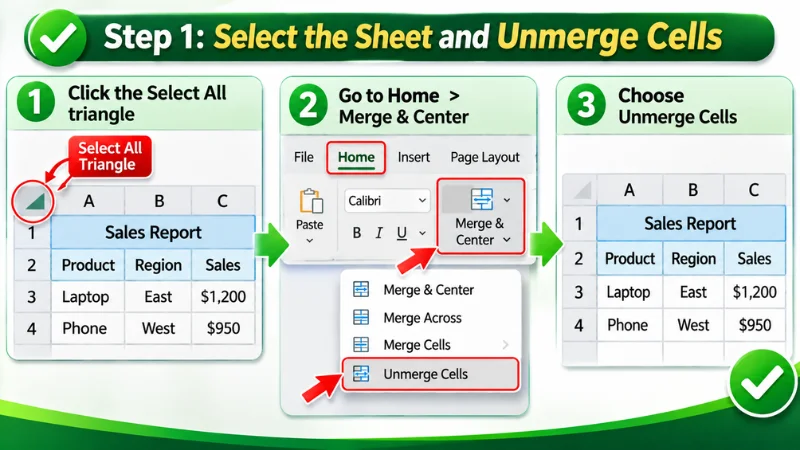
- Click the Select All triangle at the top-left corner of the worksheet to select all cells.
- Go to Home > Merge & Center and click the small arrow next to it.
- Choose Unmerge Cells.
Excel keeps the value only in the top-left cell of each merged block and leaves the other cells empty. That is why the next step matters.
Step 2: Fill the Blank Cells Left After Unmerging
- Select the data range that had merged cells, such as the category or date column. Make sure the first row contains a valid value and is not blank.
- Press Ctrl + G, click Special, choose Blanks, and click OK.
- Type =, press the Up Arrow key to reference the cell directly above, and then press Ctrl + Enter to fill all selected blank cells at once.
Each empty cell now shows the value from the cell above it, so every row has its own category, date, or label.
Step 3: Convert the Formulas to Values
- Select the same range and press Ctrl + C.
- Right-click and choose Paste Special > Values, or press Ctrl + Alt + V and select Values, then click OK.
The formulas are now fixed data. Without this step, sorting or deleting rows can break the references and change your results.
Step 4: Fix Multi-Line Headers
Converters often split a header across two or three rows, so a single column name appears in pieces.
- Type a combined header in the first header row of each column; for example, Invoice and Date become Invoice Date. You can also use a formula like =A1&” “&A2.
- If you used a formula, convert it to values with Paste Special > Values.
- Verify the headers and data alignment, then delete the extra header rows.
Your table now has one clear header row, with no merged cells, which is what filters, pivot tables, and formulas need to work correctly.
Step-by-Step: Delete Blank Rows
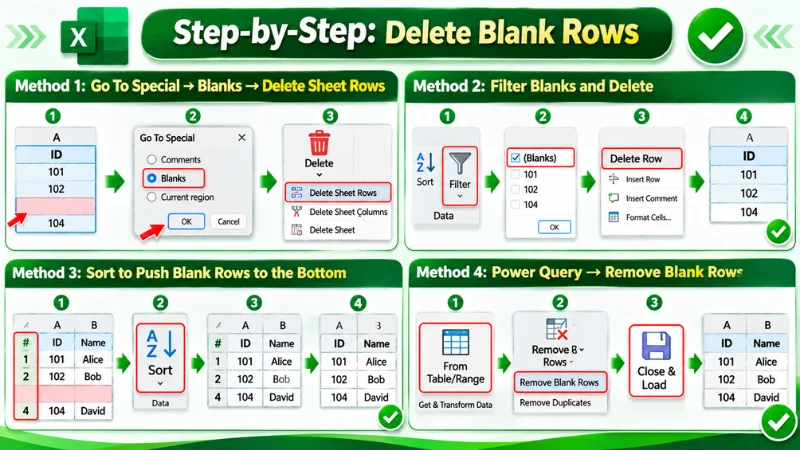
Once the merged cells are fixed, remove the empty rows. Choose the method that fits your data.
Method 1: Go To Special → Blanks → Delete Sheet Rows
- Select a column that is always filled, such as an ID or date column.
- Press Ctrl + G, click Special, choose Blanks, and click OK.
- Go to Home > Delete > Delete Sheet Rows.
This is the fastest method for a single clean table.
Method 2: Filter Blanks and Delete
- Select your data and click Data > Filter.
- Open the filter drop-down on an always-filled column and untick everything except (Blanks).
- Select the visible rows, right-click, and choose Delete Row.
- Clear the filter to see your full table again.
This method lets you see the rows before you delete them.
Method 3: Sort to Push Blank Rows to the Bottom
- Add a helper column with numbers (1, 2, 3…) so you can restore the original order.
- Select the data and go to Data > Sort.
- Sort by an always-filled column from A to Z. Blank rows move to the bottom.
- Delete the blank rows, then sort by the helper column to restore the original order.
Use this when the row order matters, and you want to avoid deleting by mistake.
Method 4: Power Query → Remove Blank Rows
- Select your data and go to Data > From Table/Range.
- In the Power Query window, click Home > Remove Rows > Remove Blank Rows.
- Click Close & Load to send the clean table back to Excel.
This method is reusable. When you refresh the query with new data, the cleanup runs again automatically.
Common Mistakes to Avoid
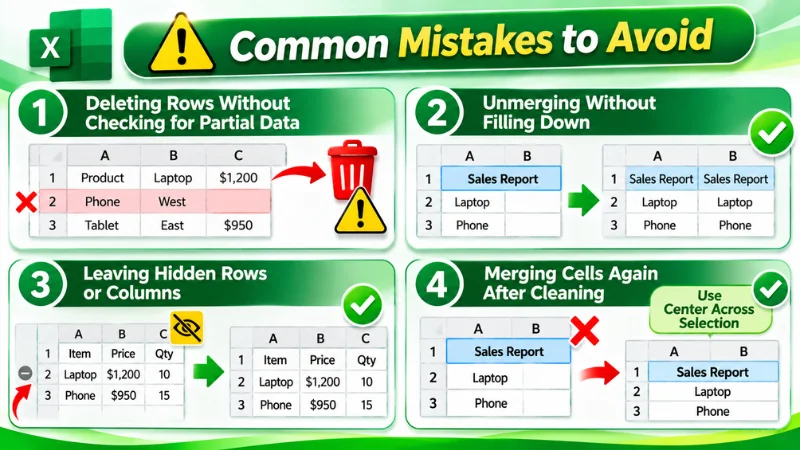
Even a simple cleanup can go wrong. Watch out for these four mistakes.
Deleting rows without checking for partial data
A row with one empty cell is not always a blank row. If you delete every row that contains a blank, you may lose real records. Always base the selection on one column that is filled in every record, and review the result before you save.
Unmerging without filling down
Unmerging keeps the value only in the top-left cell and leaves the rest empty. If you skip the fill-down step, those rows have no category, date, or label, and your sorting, filters, and pivot tables will give wrong results.
Leaving hidden rows or columns
Hidden rows and columns can still hold blank cells, extra values, or leftover merged cells. Unhide everything before you start cleaning, then decide what to keep and what to delete.
Merging cells again after cleaning
It is tempting to merge cells to make a header look better, but it brings back the same problems. Use Center Across Selection instead (Format Cells > Alignment > Horizontal > Center Across Selection). It gives you the same look without merging the cells.
Frequently Asked Questions
1. Why does my PDF to Excel file have so many merged cells?
A PDF has no real rows or columns, so converters copy the page layout. Headings centered over several columns become merged cells.
2. How do I remove all blank rows in Excel at once?
Select a column that is always filled, press Ctrl + G > Special > Blanks > OK, then go to Home > Delete > Delete Sheet Rows.
3. How do I unmerge cells without losing data?
Click Merge & Center > Unmerge Cells, select the blanks with Ctrl + G > Special > Blanks, type =, and press the Up Arrow, then press Ctrl + Enter. Finally, paste the result as values.
4. Can I clean up merged cells on Mac or Excel Online?
Yes. Both support Unmerge Cells and deleting rows. Go To Special and Power Query work best in desktop Excel.
5. Is there a way to avoid merged cells during conversion?
Yes. Use a text-based PDF and a converter that keeps the table structure, like the PDF to Excel converter.
Conclusion
Merged cells and blank rows are common after a PDF to Excel conversion, but they are easy to fix. Unmerge the cells, fill the gaps, and delete the empty rows, and your data is ready for sorting, filtering, and formulas. Follow the prevention tips, and you will spend far less time on cleanup in the future.
Want cleaner results from the start? Try to convert PDF to Excel using pdfconveter.com and get tables that keep their structure.